Introduction: The Magic of Blackstone Pizza recipe
Making pizza at home reaches new heights when you cook it on a Blackstone griddle. These amazing cooking surfaces have won the hearts of outdoor cooking fans across America. The flat top design creates a perfectly crisp crust while cooking toppings evenly. This guide will show you how to make incredible pizza right on your Blackstone.
Pizza has ancient roots in traditional brick ovens, but modern cooks have found the Blackstone griddle offers similar results with more convenience. The high heat capacity creates that perfect combination of crispy bottom and tender inside that makes great pizza crust so special. Understanding pizza dough science helps explain why this cooking method works so well for creating restaurant-quality results at home.
Home cooks love Blackstone cooking because it brings professional results to backyard cooking. The large, flat cooking surface heats up quickly and maintains steady temperatures needed for perfect pizza cooking. You can easily select the ideal flour for crispy pizza crust based on your texture preferences and cooking style. Many Blackstone owners say they’ll never go back to indoor pizza cooking after trying this method.
What Makes Blackstone Pizza recipe Special
The Unique Advantages of Cooking Pizza on a Blackstone Griddle
The Blackstone griddle offers several key benefits that make it perfect for pizza:
- High heat cooking – Reaches 500-600°F quickly for authentic pizza results
- Even heat distribution – No cold or hot spots for consistent cooking
- Large cooking surface – Make multiple pizzas at once
- Temperature control – Adjust heat zones for perfect cooking
- Outdoor cooking joy – Enjoy the fresh air while making dinner
The solid steel cooking surface of a Blackstone transfers heat directly to your pizza dough, creating a beautifully browned bottom crust that’s hard to achieve in home ovens. This direct heat contact mimics the cooking style of commercial pizza ovens.
Comparison to Traditional Pizza Ovens
When compared to standard home ovens, a Blackstone griddle offers clear advantages for pizza making. The open cooking design lets you:
- Watch the cooking process closely
- Make quick adjustments as needed
- Add toppings at the perfect moment
- Create a crispier crust texture
- Cook at higher temperatures
Many pizza experts agree that high heat is the key to great pizza. Home ovens typically max out around 500°F, while the Blackstone can push temperatures higher for that authentic pizza experience. The flat cooking surface also makes it easy to slide pizzas on and off without special equipment.
The Special Flavor Profile
The flavor of Blackstone pizza recipe has a distinct quality that sets it apart. The high-heat cooking caramelizes sugars in the dough for deeper flavor notes. The open cooking environment also allows for:
- Light char marks that add smoky notes
- Even browning of cheese
- Perfect texture contrast between crust and toppings
- Quick cooking that preserves topping freshness
The combination of these factors creates a pizza experience that rivals expensive pizza ovens costing much more. For outdoor cooking enthusiasts, the Blackstone offers versatility beyond just pizza, making it a smart addition to your outdoor cooking setup.
Essential Equipment for Making Pizza on a Blackstone
Basic Blackstone Griddle Requirements
Not all Blackstone griddles work the same for pizza making. Here’s what you need to look for:
- Size matters – A 28″ or 36″ griddle gives enough space for pizza work
- Heat control – Models with 2-4 burners allow for heat zones
- Lid compatibility – A hood or lid helps melt cheese perfectly
- Sturdy construction – Solid steel surface heats evenly for better results
The best Blackstone models for pizza include the Pro Series and Culinary Series. These models heat up fast and hold temperatures well. The multi-zone heating system lets you create different heat areas for perfect cooking control.
For beginners, even the basic 28″ Blackstone works great for pizza. The key is getting the right tools to go with it and mastering pizza dough fundamentals. Many home cooks start with a standard model and add accessories as they improve their skills.
Must-Have Pizza Tools
To make great Blackstone pizza recipe, you’ll need these essential tools:
- Pizza peel – For moving pizza on and off the griddle
- High-temp spatulas – Metal spatulas withstand the heat
- Infrared thermometer – Checks surface temperature accurately
- Pizza cutter wheel – Cuts pizza easily without dragging toppings
- Heat-resistant gloves – Protects hands during cooking
The right tools make pizza cooking easier and safer. A good metal pizza peel with a long handle keeps your hands away from the hot surface. Look for thin-edged peels that slide easily under the pizza.
Many cooks find that a combination of tools works best. Keep your pizza tools clean and ready to use each time you fire up the griddle. This creates a smoother cooking process and better results for your Blackstone cooking sessions.
Optional Accessories
While not required, these accessories can take your Blackstone pizza recipe to the next level:
- Pizza stone – Creates extra-crispy crust texture
- Pizza dome – Traps heat for melting cheese
- Perforated pizza peel – Removes excess flour during transfer
- Wooden serving peels – Presents pizza beautifully
- Pizza screen – Helps with thin crust cooking
A pizza stone made for griddle use fits right on the Blackstone surface. The stone absorbs and radiates heat evenly for perfect crust cooking. Remember to preheat the stone before placing your pizza on it.
Pizza domes work by trapping heat around the top of the pizza. This creates an oven-like environment that melts cheese perfectly. Most domes are lightweight and easy to use with one hand while cooking.
Perfect Blackstone Pizza recipe: Dough Recipe
Ingredients List
For pizza dough that works perfectly on a Blackstone griddle, you need:
- 4 cups (500g) bread flour
- 1 teaspoon (5g) instant yeast
- 2 teaspoons (12g) salt
- 1 tablespoon (15g) olive oil
- 1 tablespoon (15g) sugar (optional)
- 1½ cups (350ml) warm water
The flour choice greatly affects your pizza crust. Bread flour gives you a chewy, elastic texture that holds up well to high heat. You can mix in some all-purpose flour for a softer crust if you prefer.
The small amount of sugar feeds the yeast and helps with browning. The olive oil adds flavor and makes the dough more pliable. For a truly authentic flavor, use a high-quality olive oil in your dough mix.
Step-by-Step Dough Preparation
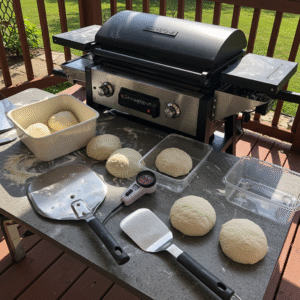
Making perfect pizza dough for your Blackstone is easy with these steps:
- Mix dry ingredients – Combine flour, salt, yeast, and sugar in a large bowl
- Add wet ingredients – Pour in warm water and olive oil
- Mix until shaggy – Use a wooden spoon until roughly combined
- Knead 8-10 minutes – Work by hand or mixer until smooth and elastic
- First rise (1 hour) – Cover and let rise until doubled
- Divide into balls – Cut into 4 equal pieces for 10″ pizzas
- Second rise (30 minutes) – Let dough balls rest before shaping
The key to great Blackstone pizza recipe lies in proper dough handling. Knead until the dough feels smooth and can stretch without tearing. The dough should feel tacky but not sticky. Add small amounts of flour if needed during kneading.
After dividing the dough, shape each piece into a tight ball. This creates tension in the dough for better texture. Let the balls rest covered with a clean towel or plastic wrap before the final shaping and cooking steps.
Make-Ahead and Storage Tips
You can make pizza dough ahead of time for quick Blackstone pizza recipe nights:
- Refrigerate dough – Store dough balls in containers up to 3 days
- Freeze for later – Wrap tightly and freeze up to 3 months
- Slow cold rise – Develop flavor with 24-72 hour refrigeration
- Room temperature finish – Take dough out 1-2 hours before cooking
Many pizza experts believe that refrigerated dough tastes better. The slow, cold fermentation creates more complex flavors in your crust. This method also fits busy schedules better than same-day dough.
When using cold dough, give it enough time to warm up before shaping. Cold dough fights back and won’t stretch properly. For best results, follow proper dough preparation techniques every time you make pizza.
Preparing Your Blackstone for Perfect Pizza
Proper Preheating Techniques
The right preheating method makes a huge difference in your pizza results. Follow these steps:
- Start with a clean surface – Remove any old food debris
- Turn all burners to high – Heat for 10-15 minutes
- Watch for color change – Surface turns slightly darker when ready
- Check temperature – Aim for 450-550°F for perfect pizza
- Create heat zones – Keep one area slightly cooler for control
Your Blackstone griddle needs this thorough preheating time. The thick steel surface stores heat energy that cooks your pizza crust quickly and evenly. Many beginners rush this step and end up with undercooked dough.
Test the heat with a few drops of water on the surface. The water should dance and evaporate within 1-2 seconds. If it disappears instantly, your griddle might be too hot. If it sits and boils slowly, wait longer for more heat.
Surface Preparation
Once hot, prep the cooking surface for pizza success:
- Apply thin oil layer – Use high smoke-point oil like avocado or grapeseed
- Spread oil evenly – Use paper towel with tongs or oil applicator
- Watch for slight smoke – This means your surface is ready
- Reduce heat slightly – Turn burners down to medium-high
- Check temp again – 450-500°F works best for most pizzas
The oil creates a non-stick surface and adds flavor to your pizza crust. Apply just enough to coat the surface—too much oil makes the dough soggy. A light, even coating works best for crispy results.
Many cooks keep their oil in a squeeze bottle for easy application. This helps control the amount and makes the process cleaner. Remember that different oils have different smoke points and flavor profiles. Choose one that matches your taste preferences.
Classic Blackstone Pizza Recipe: Sauce Recipe
Traditional Red Sauce
This simple pizza sauce brings bright flavor to your Blackstone creation:
Ingredients:
- 1 can (28oz) whole peeled tomatoes
- 2 tablespoons olive oil
- 2 cloves garlic, minced
- 1 teaspoon salt
- 1 teaspoon dried oregano
- ½ teaspoon black pepper
- Pinch of red pepper flakes (optional)
Quick Method:
- Drain tomatoes – Remove excess liquid
- Hand crush – Break tomatoes into small chunks
- Mix ingredients – Combine all items in a bowl
- Rest 30 minutes – Let flavors blend together
- Use uncooked – This sauce cooks on the pizza
The best pizza sauce often needs no pre-cooking. The raw sauce keeps its fresh flavor and cooks perfectly during the short time on the hot griddle. The heat from the Blackstone concentrates the flavors as the pizza cooks.
For a smoother sauce, blend the ingredients briefly with an immersion blender. Stop while some texture remains—completely smooth sauce often tastes flat compared to a slightly chunky version.
Alternative Sauce Options
Try these sauce alternatives for exciting pizza variations:
- White sauce – Mix ricotta, mozzarella, parmesan, garlic and herbs
- Garlic oil – Infuse olive oil with fresh garlic and herbs
- Pesto – Use classic basil pesto for bright flavor
- BBQ sauce – Perfect with chicken and red onion toppings
- Buffalo sauce – Great with chicken and blue cheese
Each sauce type needs specific cooking adjustments. White sauces work best with lower heat to prevent burning. Oil-based sauces like pesto should be used sparingly since they can make the dough soggy if applied too thick.
Consider the moisture level of your sauce when planning cooking time. Wetter sauces need longer cooking times, while drier options cook faster. This balance helps you get perfectly cooked crust and toppings every time.
Topping Combinations and Recommendations
Classic Combinations
These pizza toppings work great on Blackstone pizzas:
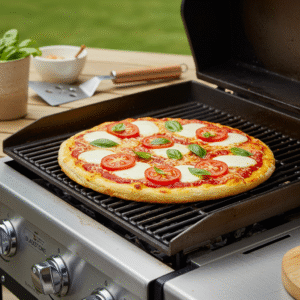
- Margherita – Tomato sauce, fresh mozzarella, basil (add after cooking)
- Pepperoni – Tomato sauce, mozzarella, pepperoni slices
- Supreme – Tomato sauce, mozzarella, pepperoni, sausage, bell peppers, onions, olives
- Meat Lovers – Tomato sauce, mozzarella, pepperoni, sausage, bacon, ham
- Veggie – Tomato sauce, mozzarella, bell peppers, onions, mushrooms, olives
The key to great Blackstone pizza recipe lies in topping balance. Too many toppings make the pizza soggy and hard to cook through. Start with a light hand—you can always add more next time.
Pre-cook raw meat toppings before adding them to your pizza. The short cook time on the griddle won’t fully cook raw sausage or chicken. This step also removes excess fat that might make your pizza greasy.
Gourmet Options
Take your pizza flavor to new heights with these premium combinations:
- Fig and Prosciutto – White sauce, mozzarella, fig jam, prosciutto, arugula (add after cooking)
- Mediterranean – Olive oil base, feta, artichokes, olives, sun-dried tomatoes
- Truffle Mushroom – White sauce, wild mushrooms, truffle oil drizzle
- Buffalo Chicken – Buffalo sauce, chicken, mozzarella, blue cheese crumbles
- Breakfast Pizza – White sauce, bacon, eggs, cheddar cheese
When using premium cheeses, place them strategically. Hard cheeses like parmesan work best grated fine and added near the end of cooking. Soft cheeses like burrata should be added after cooking to keep their creamy texture.
Delicate toppings like fresh herbs and leafy greens burn easily. Add these after the pizza comes off the griddle. The residual heat will gently wilt them without burning or turning them bitter.
Step-by-Step Cooking Method
Preparing the Cooking Surface
After your griddle reaches the right temperature, follow these steps for pizza success:
- Oil check – Confirm your surface has a thin, even oil layer
- Heat zones – Set one side to medium-high, one to medium
- Temperature test – Aim for 450°F in your main cooking zone
- Tool setup – Arrange all tools and toppings within easy reach
- Clear space – Make room for the pizza to rest after cooking
Your cooking preparation makes a big difference in results. Keep everything organized and ready before you start cooking. Many pizza problems come from scrambling for tools or toppings while the dough starts cooking.
Create a smooth workflow by setting up your ingredients in order of use. This helps you work faster once the dough hits the hot surface. Quick work leads to better pizza with perfect crust texture.
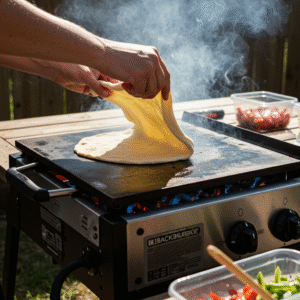
Dough Handling
Handle your pizza dough with these simple techniques:
- Dust with flour – Lightly flour your work surface and hands
- Press don’t stretch – Start by pressing dough from center outward
- Pick up and stretch – Let gravity help stretch the dough evenly
- Rotate as you go – Turn the dough for even thickness
- Keep edges thicker – Leave a slight rim for the crust
Aim for a 10-12 inch circle with slightly thicker edges and thin center. Thin dough (about ¼ inch) cooks better on a Blackstone griddle. The dough should stretch without breaking when pulled gently.
Don’t worry about perfect circles. Rustic, hand-shaped pizza has more character and tastes just as good. If holes appear, pinch them closed or fold a small piece of dough over them.
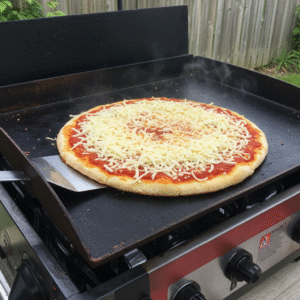
Cooking Process
Follow this method for perfect Blackstone pizza recipe:
- Dust peel with cornmeal – Prevents sticking during transfer
- Place dough on peel – Lay stretched dough on the dusted peel
- Add sauce – Spread a thin layer leaving ½ inch around edges
- Add toppings – Apply cheese and toppings quickly
- Transfer to griddle – Slide pizza onto the hot surface with a quick motion
- Cook 2-3 minutes – Watch for bubble formation and browning underneath
- Check bottom – Lift edge gently with a thin spatula to check color
- Cook toppings – Use dome if available to melt cheese
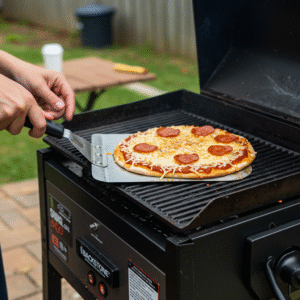
- Remove when done – Slide large spatula under pizza and transfer to cutting board
- Rest 1-2 minutes – Allow pizza to set before cutting
The whole cooking time runs 4-6 minutes depending on your heat and toppings. Watch the pizza constantly during cooking. The bottom cooks faster than toppings, so balance your heat carefully.
You might need to rotate the pizza during cooking for even browning. Use a large spatula or pizza peel to lift and turn the pizza 90 degrees halfway through cooking.
Using Accessories
These tools help create better pizza results:
- Pizza stone – Preheat stone for 20 minutes before cooking
- Pizza dome – Place over pizza for 1-2 minutes to melt cheese
- Heat-safe gloves – Wear when handling hot tools
- Metal peel – Best for moving pizza onto hot surface
- Wooden peel – Great for serving finished pizza
When using a pizza stone on your Blackstone, place it on the griddle during preheating. The stone needs time to absorb heat completely. Slide your prepared pizza directly onto the hot stone and cover with a dome if possible.
The dome creates an oven-like environment that cooks toppings evenly. Without a dome, you might need to lower heat slightly and cook longer to avoid burning the bottom before toppings finish.
Temperature Management
Control heat for the best pizza cooking results:
- Watch for hot spots – Move pizza as needed for even cooking
- Adjust burners – Turn down if bottom cooks too fast
- Use zones – Move pizza to cooler zone if needed
- Consider thickness – Thicker dough needs lower heat
- Topping factors – More toppings need lower heat, longer time
Heat management might be the most important skill for Blackstone pizza recipe making. Too hot burns the bottom while leaving toppings raw. Too cool makes soggy, undercooked pizza. Find the sweet spot through practice and careful monitoring.
Most cooks find that starting hotter then reducing heat works well. The initial high heat sears the bottom crust, then lower heat finishes cooking without burning. This two-stage approach works especially well for heavily topped pizzas.
Troubleshooting Common Issues
Dough Problems in Your Blackstone Pizza Recipe
Fix these common pizza dough issues that may affect your blackstone pizza recipe:
Sticking to surface – Use more cornmeal or flour on the peel when working with your blackstone pizza recipe.
Tearing during stretch – Let dough warm up more before stretching for a smoother blackstone pizza recipe process.
Too elastic – Let dough rest 10 minutes to relax the gluten for better results in your blackstone pizza recipe.
Burning too quickly – Make dough slightly thicker or lower the heat during your blackstone pizza recipe cook.
Undercooked middle – Stretch the middle thinner than edges for an evenly baked blackstone pizza recipe.
Most dough problems during a blackstone pizza recipe come from temperature or handling. Cold dough fights stretching and tears easily. Overworked dough springs back too much when stretched. Find the middle ground with room-temperature dough that feels alive but not too springy.
For sticky dough while making your blackstone pizza recipe, add small amounts of flour during handling. Too much flour makes a tough crust, so use just enough to prevent sticking. A bench scraper helps manage sticky dough without adding excess flour.
Temperature Challenges in Your Blackstone Pizza Recipe
Solve these temperature issues for better blackstone pizza recipe results:
Burnt bottom, raw top – Lower heat, use a dome or cover when cooking your blackstone pizza recipe.
Raw bottom, cooked top – Increase heat or pre-cook toppings for a more balanced blackstone pizza recipe.
Uneven cooking – Rotate pizza and manage burner levels while working on your blackstone pizza recipe.
Too fast cooking – Lower heat and make dough slightly thicker in your blackstone pizza recipe.
Too slow cooking – Increase heat and stretch dough thinner to speed up your blackstone pizza recipe.
Learn to “read” your pizza as it cooks during a blackstone pizza recipe. The bubbling of the cheese, the color of the crust, and the overall appearance tell you when to adjust. Most Blackstone griddles have hot spots, so moving the pizza helps even browning.
Keep notes on what works with your specific griddle model. Each Blackstone has unique heating patterns, and your notes will help you improve every blackstone pizza recipe you make.
Blackstone Pizza recipe Accessories and Modifications
The right tools make Blackstone pizza recipe cooking even better. Here are must-have accessories that improve your pizza results:
Essential Pizza Add-ons
- Pizza dome cover – Traps heat above your pizza for quicker, more even cooking
- Pizza stone – Creates the perfect crispy crust and helps distribute heat
- Metal pizza peel – Helps you slide pizzas onto the hot griddle surface safely
- Infrared thermometer – Checks exact surface temperature for perfect cooking
Smart DIY Modifications
Many Blackstone griddle owners improve their pizza-making with these simple changes:
- Heat reflectors – Aluminum sheets direct heat where you need it most
- Brick border – Fire bricks around cooking area hold heat better
- Wind guards – Help maintain temperature on windy days
- Chimney cap modification – Some users add a pizza space above the griddle
Is It Worth The Money?
Before buying extras for your Blackstone pizza recipe setup, think about:
- How often you’ll make pizza
- Your budget for accessories
- Storage space for extra equipment
- Which items help fix your specific cooking challenges
Start with basic tools and add more as you need them!
FAQ Section
Can you cook a pizza on a Blackstone griddle?
Yes! You can absolutely cook pizza on a Blackstone griddle. The flat cooking surface gets very hot (up to 500°F), which creates a crispy crust. The large cooking area fits multiple pizzas at once. Many pizza lovers actually prefer griddle cooking because of the even heat distribution and the perfect crust it creates. A great Blackstone pizza recipe takes full advantage of this setup for restaurant-quality results at home.
Can I put a pizza stone on my Blackstone griddle?
Yes, you can use a pizza stone on your Blackstone. Place the stone on the griddle during preheating so it heats up gradually. This helps prevent cracking. The stone adds another layer of heat distribution and creates that classic pizza crust texture. For a more authentic Blackstone pizza recipe, using a stone helps mimic a traditional pizza oven experience. Just be sure to use one rated for high outdoor temperatures.
Is Blackstone a good pizza oven?
While not designed as a pizza oven, Blackstone griddles make excellent pizza. They reach high temperatures needed for pizza cooking and offer a large, flat surface. The main difference: traditional pizza ovens heat from all directions, while Blackstone heats from below. Many users add a dome cover to create more surrounding heat. With the right technique and a reliable Blackstone pizza recipe, you can get oven-like results at a fraction of the cost.
Can I turn my Blackstone into a pizza oven?
You can make your Blackstone work like a pizza oven with simple additions. Add a pizza stone for better heat distribution and a dome hood or cover to trap heat above the pizza. Some users build DIY heat reflectors around their cooking space. These modifications help your Blackstone mimic a traditional pizza oven’s cooking environment—especially when paired with a well-tested Blackstone pizza recipe.
Do you need a pizza stone to grill pizza?
No, you don’t need a pizza stone for griddle pizza, but it helps! A stone adds more consistent heat distribution and pulls moisture from the dough for a crispier crust. Without a stone, you can cook directly on the griddle surface with excellent results. Many pizza experts prefer the direct griddle method for its unique texture and faster cooking time. Either way, a solid Blackstone pizza recipe makes all the difference.
Why did Blackstone discontinue the pizza oven?
Blackstone discontinued their dedicated pizza oven attachment due to production costs and consumer preference for versatility. The company found most customers preferred using the standard griddle with pizza accessories instead of a single-purpose attachment. This lets users cook pizza plus many other foods on the same equipment. The good news: regular Blackstone griddles still make amazing pizza with the right techniques—and a good Blackstone pizza recipe is key to getting it right every time.
Tips from Blackstone Pizza Recipe Experts
We asked outdoor cooking pros and experienced Blackstone users for their top tips to perfect your blackstone pizza recipe at home:
Pro Techniques That Work
- Cold ferment your dough – “I make my dough 2–3 days ahead and keep it in the fridge. This creates amazing flavor development,” says BBQ champion Mike S., who swears by this step in his blackstone pizza recipe routine.
- Two-zone cooking – “I heat one side of my griddle hotter than the other. This lets me start the pizza on high heat for the crust, then move it to lower heat to finish cooking toppings,” shares food blogger Jenna T., a seasoned blackstone pizza recipe creator.
- Rest your dough – “Always let your dough come to room temperature before stretching. Cold dough springs back and fights you,” advises chef Tom W., a longtime fan of the blackstone pizza recipe method.
Restaurant Tricks for Home Use
- Corn meal sprinkle – Add corn meal under your pizza for extra crunch and easy sliding when preparing your next blackstone pizza recipe.
- Par-bake thick crusts – Cook thick dough for 1–2 minutes before adding toppings to prevent soggy centers in your blackstone pizza recipe.
- Less is more – Top chefs use fewer toppings but choose high-quality ingredients to elevate any blackstone pizza recipe.
- Finish with fresh herbs – Add basil and other delicate herbs after cooking for a gourmet touch to your blackstone pizza recipe.
Conclusion
Making a blackstone pizza recipe on your Blackstone griddle combines the joy of outdoor cooking with everyone’s favorite food. With the right techniques and simple equipment, your backyard griddle creates pizza that rivals fancy restaurants.
The versatility of the blackstone pizza recipe approach means you can make anything from thin-crust classics to deep-dish creations. Each pizza comes off the griddle with that perfect contrast between a crispy exterior and a soft interior.
Now it’s your turn! Heat up your griddle, gather your favorite toppings, and start making an amazing blackstone pizza recipe outdoors. Your friends and family will thank you!
Discover Quick & Fun Recipes on TikTok with ToDaRecipes
Looking for fast, visual inspiration to spice up your meals? At ToDaRecipes, we love sharing easy, creative, and delicious recipes that anyone can try at home—and TikTok is the perfect place to see them in action!
Whether you’re into juicy burgers, refreshing drinks, or sweet desserts, our TikTok videos show step-by-step instructions in under a minute. It’s the fastest way to get inspired and start cooking.
👉 Check out our TikTok here: ToDaRecipes on TikTok and follow us for bite-sized kitchen magic!
Explore trending food ideas, kitchen hacks, and recipe tutorials designed to make cooking fun and simple. Don’t just read the recipe—watch it come to life!